It is currently 23 Apr 2024, 14:53


New Topic Add Reply
Author Message
Post 06 Apr 2022, 07:03 • #1 
Guide
Joined: 06/30/20
Posts: 255
So I am finally trying my first spigot ferrule work on a rod. Its a heddon rod that had the sizematic ferrules. Someone was really rough with it and the aluminum was all messed up.

First mistake I made was when I went to remove them. I heated the ferrules too far and instead of the ferrules coming off, the blank underneath melted. so I had to cut the rod back a touch on the bottom section. not the top and bottom are not a clean fit to each other - the bottom has a larger ID than the top when brought back together.

I bought solid glass ice rods to use as ferrule stock. I have the Dale Clemens book. Inside he explains how to create a spigot ferrule. What I found is there are two ways to do it. One is to slide the solid glass into the top section, ensuring a perfect fit on the top section. This is Dale's way. The second way I've found is to slide the solid glass into the bottom section, ensuring a tight fit there. In either case, I need to adjust the other side to fit. If I do the top section perfect fit, the bottom section ends up too small. If I go with the bottom section perfect fit, the top section is way too large. I then have to take a bunch of material off to get the top section to fit.

I tried both methods last night because I had the solid glass blank and the sections I needed to cut were both available on the same solid glass. I'm pretty sure this is due to it not being a clean cut through the rod at one point - because I lost some material from the bottom section when removing the old ferrule.

Here are my questions:

1. when doing the perfect fit in the top section method, the bottom section is loose. I thought of shimming the bottom section with tape along the length of where the spigot would meet the walls of the rod inside, to get a perfect tight fit. Has anyone ever done this? Obviously its no longer glass on glass in that case and so I worry it won't work.

2. when doing the perfect fit on the bottom method, I had a TON of material to take off the top section. At first I tried Dale's method - scraping with a knife. however, this took forever and was really impossible to retain a good shape on the plug (round and good taper). So I ended up putting it into my drill and taking the material off with sandpaper. That worked much better and resulted in a better fit. However, I have a bit of wobble in the top section when I put it together, due to the tapers not being exactly the same.

I'm wondering what knowledge if any people are willing to share to help me out. I have 5 more of the ice rod blanks at home so I can take another stab at this with a new piece of ferrule stock. Thanks all!


Top
  
Quote
Post 06 Apr 2022, 07:22 • #2 
Glass Fanatic
Joined: 04/20/07
Posts: 8933
Location: US-ME
Well, I would fit the male section of the spigot to the tip. Then I would fit the spigot to the butt section. That part of the spigot is easily fit by using nylon thread wraps to build up a good snug shim fit, and glue takes care of the rest.

Having said that, consider your goal. If you want to practice making and fitting a spigot, best to do that from an undamaged rod or blank that has continuity between sections. The repair with what you have just introduces another complication.

In and of itself, that repair is best accomplished with another metal ferrule set. Stents and or thread shims may be necessary to enable the sections OD to match the ID of the ferrules, but that's more straightforward.


Top
  
Quote
Post 08 Apr 2022, 09:36 • #3 
Glass Fanatic
Joined: 06/23/05
Posts: 4971
Location: US-MT
Was not uncommon for rod maker to have a two piece rod...and when you removed the metal ferrules found the butt OD and the tip OD were quite different...........Garcia comes to mind in this regard. Which makes it more challenging to do a nice spigot.
So it may not just be because you lost a bit of the butt.
Good luck!


Top
  
Quote
Post 08 Apr 2022, 11:14 • #4 
Glass Fanatic
Joined: 04/12/07
Posts: 1296
Location: western Massachusetts
You have one of the more complicated ferrule repairs there. You are dealing with a step-down situation because the inside diameters of those old rubber washer aluminum ferrules were two different ID diameters. So, if you are planning on using a metal ferrule, you will have to use a step down nickel-silver ferrule, or a correctly sized, aluminum old-stock ferrule such as you removed. You will also need to add a section, like a spigot, sized to make-up the rod part you cut away under the ferrule. Then glue the ferrule to that.

If you are going to use a spigot, and not make up the length of the rod blank you lost, I would suggest you first size the ferrule to fit the tip, then use shims to fit the spigot to the butt section, as Whrlpool and Majic have suggested. It may look ugly and it may not work - I don't know. Perhaps there are others who have a different idea.


Top
  
Quote
Post 11 Apr 2022, 12:49 • #5 
Guide
Joined: 06/30/20
Posts: 255
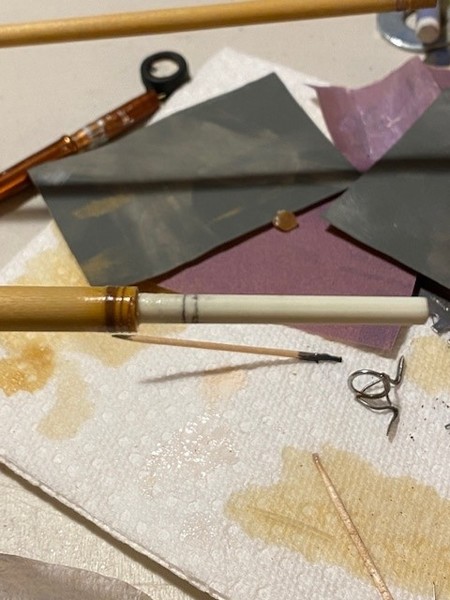
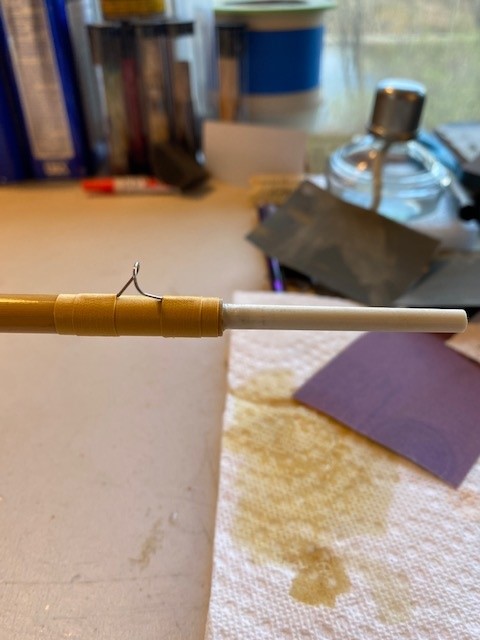
Hello team! Here is the result of what I found. I ended up using the method suggested in this thread. Fit the ferrule stock to a really nice snug fit on the top (male) section. Then shim the bottom. I shimmed the bottom section with tape just as I would a reel seat to get a nice flush fit when sliding in. Then I prepped the inside walls of the lower section by cleaning, then added extra epoxy inside the opening. applied a thin coat of epoxy to the entire shimmed section of the ferrule, then slid in place. cleaned off the area around the ferrule for a nice flat epoxy look. When assembled there is a touch more than 1/4" of ferrule visible to account for future wear.

once dry, I took the sections out and "cast" them. I was looking for clicking or any feel that didn't seem right. No issues! So I immediately started on the rest of the rod build (finish on the blank, then positioning and wrapping guides). Some pics below for those who are curious. As Dale Clemens and many on here have recommended I went with a full underwrap then an overwrap on the guide that sits on the ferrule. Being made by me I want as strong of a bond there as possible.

Overall I would say that spigot ferrules are NOT nearly as hard as I expected. We'll see if mine hold up over time, jury is still out on that. But I think most rod makers hold this close to their vest because it seems difficult, most people never try it, and it becomes a competitive advantage for them to be good at it. In my case, I just bought 5 solid fiberglass ice rod blanks and cut them as needed with a cut off wheel on a dremel tool. Outside of the ferrule stock the only other cost was the epoxy needed to hold in place, and the tape used to shim.


Top
  
Quote
Post 12 Apr 2022, 19:02 • #6 
Master Guide
Joined: 02/04/12
Posts: 709
Location: SE Pa
Nice Going !!!


Top
  
Display posts from previous:  Sort by  

New Topic Add Reply


Who is online

Users browsing this forum: No registered users and 13 guests


You cannot post new topics in this forum
You cannot reply to topics in this forum
You cannot edit your posts in this forum
You cannot delete your posts in this forum

Jump to:  
Google
Powered by phpBB® Forum Software © phpBB Group